AI Ouija Board

A seance-inspired installation powered by CoreXY robotics and generative AI

AI Ouija Board installation
Interactive InstallationCoreXY MechanicsVoice InterfacesGenerative AI

CoreXY gantry hidden beneath the board drives a neodymium magnet with ±0.5 mm repeatability across a 650 mm workspace.

Hands-free visitor flow pairs PyAudio capture, Whisper transcription, and a GPT persona to answer questions in under nine seconds.

A Raspberry Pi orchestrates audio and API calls while an Arduino running GRBL executes deterministic motion trajectories.

Overview

The AI Ouija Board fuses traditional planchette storytelling with modern robotics and language models. Visitors whisper a question, the system transcribes the audio, prompts a GPT persona, and then drives a concealed magnet to spell the reply letter by letter. The installation was built alongside Evan Park and David Vaughn during Fab Academy Machine Week.

The build emphasizes a self-contained loop: a Raspberry Pi 4B handles audio capture, Whisper inference, and OpenAI requests; an Arduino Uno running GRBL translates the resulting string into motion; and a CoreXY gantry hidden beneath the board delivers the theatrical reveal. One "commune" takes around 90 seconds.

Experience Design

We began with Jack Hollingsworth’s automated Ouija board and set out to remove the keyboard, laptop, and exposed UI. The final flow relies solely on audio prompts and ambient cues: visitors tap a capacitive panel, speak their question, watch the board “think,” and then follow the planchette as it answers in an intentionally ominous tone.

Persona prompts constrain GPT responses to stay in character and under twenty-five characters. Keeping replies concise limits traversal distance, protects the hardware from prolonged stalls, and ensures every session feels responsive.

Fabrication & Mechanics

CNC Enclosure

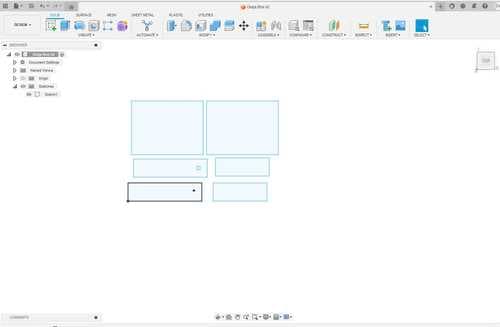
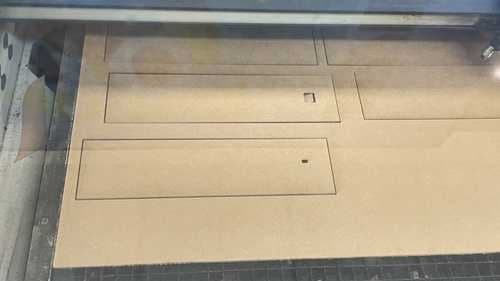
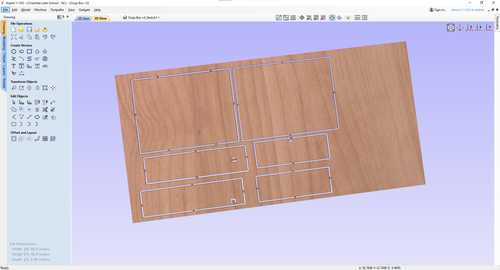
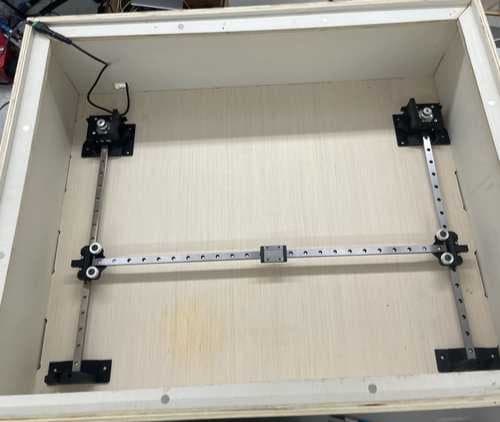
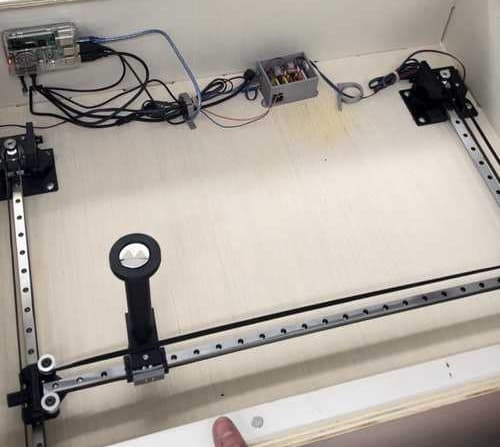
The enclosure was parameterized in Fusion 360 to balance portability with enough interior volume for the gantry and electronics. We iterated with laser-cut cardboard mockups before milling the final birch panels on a ShopBot.

  • Finger joints with dogbones for a press-fit lid held in place by embedded magnets.
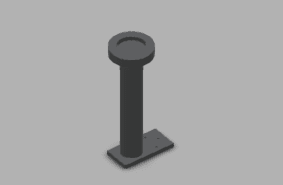
  • Ports for USB access, microphone routing, and a removable planchette bay.
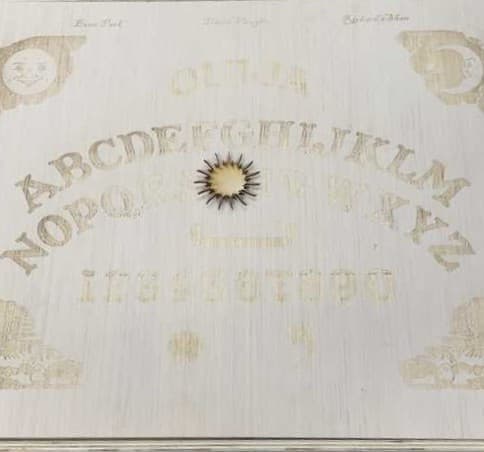
  • Laser-engraved board artwork with a custom punctuation set.
Fusion 360 layout of the enclosure with finger jointsLaser-cut cardboard prototype confirming geometryAspire toolpath preview used for the ShopBot pass

CoreXY Gantry

Beneath the surface, a CoreXY layout drives a magnet carriage. Both stepper axes contribute to most moves, so belt tension and driver tuning were critical: we tightened belts to 40–45 N using a tension gauge and tuned DRV8825 current limits to 0.9 A to avoid missed steps.

We verified backlash by jogging between fiducial marks and measuring the error with a dial indicator. The resulting ±0.5 mm repeatability is well within the letter-spacing tolerances of the engraved board.

CoreXY rails and carriages mounted inside the enclosureCable management and belt routing during assembly3D printed magnet saddle used to drive the planchette

Planchette

A wooden planchette houses the magnet saddle. The saddle offsets the magnet to clear belt hardware, so the coordinate lookup table incorporates a 7.5 mm Y-offset. Interchangeable caps let us experiment with translucent pointers and engraved acrylic lenses.

Electronics & Control

Control Stack

Motion control is anchored by an Arduino Uno flashed with GRBL 1.1f on a CNC shield. Two NEMA 17 steppers and DRV8825 drivers, microstepping at 1/16, deliver 80 steps/mm. Dual limit switches square the axes, and the Pi communicates over USB serial at 115200 baud.

  • Separate 12 V / 8 A supply for motors and 5 V regulator for logic to avoid brownouts.
  • Hardware flow control prevents overruns when streaming multi-character responses.
  • Planchette dwell timing handled on the Pi to keep G-code buffers predictable.

Calibration

Each character on the board maps to a coordinate pair captured with a dial indicator. The helper below reads the lookup table, enforces two-decimal precision, and writes newline-terminated commands that GRBL expects.

const FEED_RATE = 2200;

function moveTo(letter: string) {
  const [x, y] = alphabetMap[letter.toUpperCase()];
  const command = `G1 X${x.toFixed(2)} Y${y.toFixed(2)} F${FEED_RATE}\n`;
  serial.write(command);
}

Software & AI Pipeline

Speech Interface

A Raspberry Pi 4B logs audio via PyAudio using 16-bit PCM at 22.05 kHz to minimize buffer overruns. Before recording starts, the script enumerates audio devices to pin the USB microphone index and verify supported sample rates.

Audio Processing Flow

  1. USB microphone → PyAudio stream (16-bit PCM, dual-channel, 22.05 kHz, chunk size 2048).
  2. Stream stored as a temporary WAV buffer (`output.wav`) for reproducible processing.
  3. Local Whisper “base” model produces a transcript averaged at 3.1 s per clip.
  4. Transcript forwarded to OpenAI Chat Completions (GPT-3.5 Turbo) with a 25-character, in-character prompt template.
  5. Ai response streamed over `/dev/ttyUSB0` at 115200 baud, newline-terminated for GRBL consumption.

Response Engine

Whisper provides dependable transcripts even in exhibition halls. The transcript feeds a GPT persona that is primed to stay in character and respect a strict character budget. We validated prompts with synthetic inputs to ensure tone and brevity before shipping to the show floor.

Motion Translation

The Pi streams characters over serial, each resolving to a coordinate lookup and a buffered `G1` move. We inject a configurable 1.5-second dwell between letters so audiences can register each stop. Feed rates are capped at 2200 mm/min to prevent belt slip.

A watchdog timer pauses the sequence if no acknowledgment is received within the dwell window—a safeguard that proved useful when visitors brushed the planchette mid-run.

Assembly & Integration

We staged the integration over a weekend: mechanical bring-up on Friday, electronics on Saturday, and software tuning on Sunday. Keeping each layer modular simplified debugging when we inevitably retraced steps.

  1. Square the rails, tension belts, and verify smooth travel end-to-end.
  2. Install the Raspberry Pi, CNC shield, and power distribution with strain relief.
  3. Jog the gantry through every coordinate, logging any hotspots before closing the lid.
  4. Bring up serial communication and stream scripted phrases to validate the lookup table.
  5. Layer in audio capture and persona prompts, then rehearse full sessions with the enclosure sealed.

Exhibition

Demo clip captured during FabAcademy Machine Week

Lessons & Future Work

  • Keep spare belts and idlers on hand—long duty cycles reveal tiny alignment issues quickly.
  • Prompt guardrails and character limits are essential when operating an LLM in public.
  • Visitors appreciate feedback; subtle LED cues reduced accidental double prompts.

Next steps include experimenting with multi-planchette storytelling, adding positional audio, and expanding the coordinate map to support numerology modes without sacrificing speed.

Downloads

Project Bundle

CAD, firmware, Python scripts, and documentation from FabAcademy Machine Week.

Download .zip